 Upload Artwork
Island Turnkey Booths with Lighting: Expert Playbook
![]() 14 min read
14 min read
Key Takeaways
- Strategic lighting integration is the key factor that differentiates ordinary island booths from highly engaging ones.
- Island turnkey booths with lighting turn basic brand displays into magnetic engagement hubs.
- Lighting designed into booth architecture provides 360-degree visibility and enhances product demonstrations.
- Proper lighting integration leads to measurable increases in foot traffic and lead quality.
Table of Contents
- Why Lighting-First Island Turnkey Booths Win
- What Is an Island Turnkey Booth with Lighting?
- Island Sizes and Layout Fundamentals
- Lighting Basics for Island Turnkey Booths
- Integrating Illuminated Branding Elements
- Power, Rigging, and Safety—What Exhibitors Need to Know
- Turnkey vs. Custom vs. Hybrid: Strategic Comparison
- Budgeting: What Drives Cost in Light-Forward Island Turnkey Booths
- How to Choose the Right Island Turnkey Booth Size and Layout
- Planning a Lighting Strategy That Works
- Specifying Electrical for Lighting-Heavy Islands
- Designing a Hanging Sign and Overhead Light Grid
Why Lighting-First Island Turnkey Booths Win
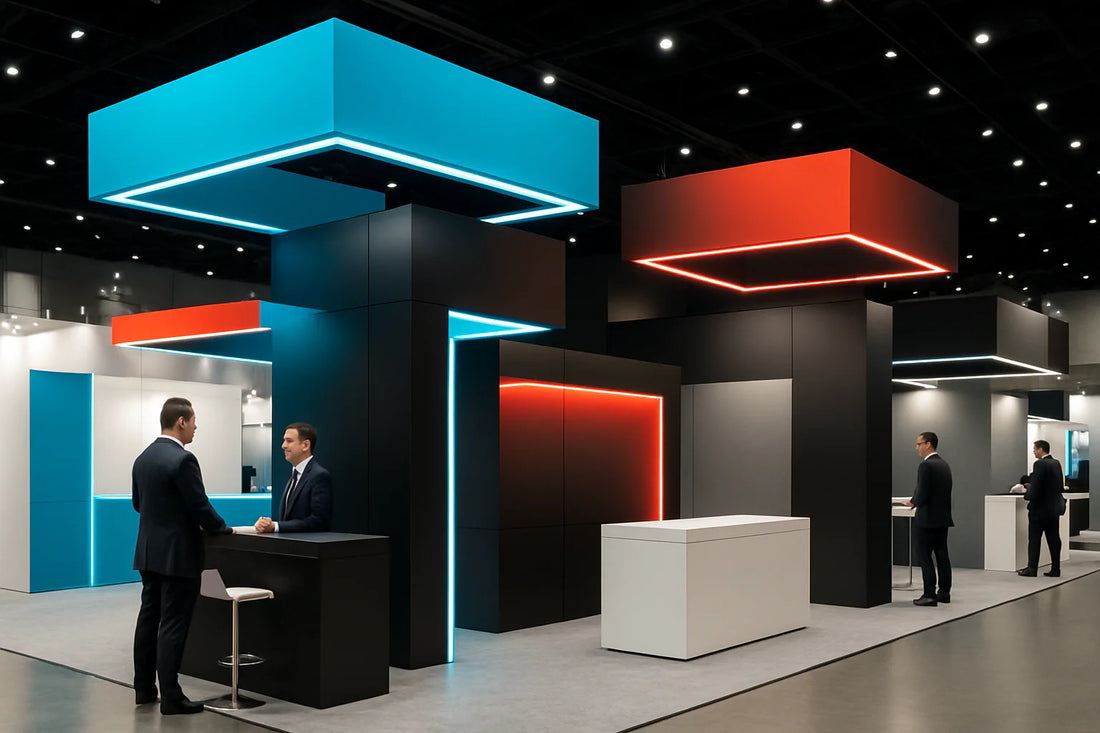
The difference between an ordinary island booth and one that stops traffic? Strategic lighting integration. Island turnkey booths with lighting transform rental displays from basic brand presence into magnetic engagement hubs that pull visitors from across the show floor. When lighting is designed into the booth architecture—not added as an afterthought—you get 360-degree visibility, enhanced product demonstrations, and measurable increases in foot traffic and lead quality.
This playbook delivers the tactical knowledge you need to choose, specify, and execute a lighting-forward island rental that looks custom-built while maintaining turnkey speed and cost control. From 20x20 entry islands to flagship 30x30+ experiences, you'll understand exactly how to maximize visual impact, ensure compliance, and drive ROI through strategic illumination.
As your full-service partner for nationwide island turnkey builds and rentals, Iconic Displays handles every detail from lighting design and electrical coordination through installation, teardown, and storage—so you can focus on what matters most: engaging prospects and closing deals.
For exhibitors seeking to maximize booth illumination, pop up display lights offer a flexible and efficient solution for both rental and custom island builds.
What Is an Island Turnkey Booth with Lighting?

An island booth sits open on all four sides, creating maximum visibility and natural traffic flow from every aisle approach. The "turnkey with lighting" designation means you receive a complete, ready-to-exhibit package: structure, graphics, integrated lighting system, flooring, furniture, AV coordination, electrical planning, professional installation, and on-site support.
The lighting component isn't just fixtures bolted onto rental walls. It's a cohesive illumination strategy featuring backlit SEG graphics, overhead wash lighting, accent spots, and brand-focused elements like halo-lit logos—all pre-programmed and coordinated to your brand objectives and show environment.
Choose island turnkey booths with lighting when: You're launching products requiring 360° visibility, exhibiting at high-stakes shows like CES or SXSW where standout presence matters, or need custom-level polish without ownership complexity and storage burden.
For more insights on maximizing the impact of illuminated exhibits, see our guide to backlit turnkey trade show booths and how they can elevate your brand presence.
Island Sizes and Layout Fundamentals
Common Island Footprints
20x20 islands serve as the most popular entry point, supporting a central lightbox tower or open-plan design with hanging signage. This footprint accommodates 2-3 demo stations and one small meeting area while maintaining clear sightlines.
20x30 islands add dedicated zones for product demonstrations and semi-private meetings, plus stronger control over visitor flow patterns. The additional space supports more sophisticated lighting grids and hospitality elements.
30x30+ flagship islands enable multi-zone experiences with dedicated product stages, hospitality lounges, and larger rigging systems for complex lighting installations.
Layout Archetypes That Maximize Lighting
The central tower approach places an illuminated brand beacon at the booth's heart, with perimeter demo stations creating easy navigation and clear focal hierarchy. Open-plan four-corner engagement maximizes ingress and egress while promoting discovery through strategic accent lighting.
Split-level designs separate product staging, demo pods, and meeting areas using lighting layers to define each zone's purpose and energy level. Always position hospitality and storage behind primary engagement areas, using lighting to pull sightlines toward hero graphics and demonstration zones.
Lighting Basics for Island Turnkey Booths
Core Lighting Objectives
Effective island lighting achieves five critical goals: distance visibility that draws prospects from far aisles, brand-appropriate ambiance that reinforces your market position, focal hierarchy that guides visitor attention, balanced foot traffic distribution across all four approaches, and full compliance with show electrical and safety regulations.
Essential Lighting Types and Layers
LED spotlights provide precise product and signage highlighting, while wash lighting creates even ambient coverage across your entire footprint. Backlighting transforms SEG fabric graphics into glowing brand statements, and edge lighting adds sophisticated halo effects to counters and display shelves.
Overhead truss lighting delivers uniform, glare-controlled coverage ideal for islands, while accent RGB and DMX systems enable dynamic brand moments and timed product reveals during presentations.
Expert Insight: Layer your lighting in three levels—ambient (base coverage), task (demo areas), and accent (graphics and logos). Use 3500-4000K color temperature for tech environments, 3000-3500K for wellness and beauty warmth, and always specify CRI 90+ for accurate color rendering and photography.
For a deeper dive into modular booth strategies, read about how to create a flexible event strategy with modular tradeshow booths and adapt your lighting plan for any show footprint.
Integrating Illuminated Branding Elements

Backlit SEG Fabric Graphics
Backlit SEG (Silicone Edge Graphics) systems create stunning hero storytelling walls and product benefit displays. Best practices include ensuring uniform light diffusion without hotspots, using high-resolution artwork optimized for backlighting, and specifying modular frames that collapse for efficient shipping and storage.
Halo-Lit Logos and Lightbox Towers
Halo-lit dimensional logos provide depth and contrast while maintaining readability in photos—include dimming controls to prevent overexposure. Lightbox towers anchor your island presence, remaining visible from distant aisles while concealing structural cores and storage within illuminated brand messaging.
Hanging signs coordinate with ground-level lighting through consistent color temperature and complementary downlighting patterns. Choose shapes—round, square, or tapered—that align with your brand architecture and optimize visibility from primary traffic approaches.
To understand how color temperature affects your booth's ambiance and product presentation, see this color temperature overview.
Power, Rigging, and Safety—What Exhibitors Need to Know
Electrical Planning Fundamentals
Calculate total electrical load including lighting drivers, AV systems, device charging, and any appliances, then distribute across multiple 20-amp circuits with staggered startup sequences. Plan cable management through ceiling drops when possible to avoid floor-level trip hazards, and label all circuits for quick troubleshooting during show hours.
Rigging and Compliance Essentials
Truss and hanging point specifications must include load ratings, balanced weight distribution, and venue-approved hardware. Submit scaled plans with elevations, load calculations, and complete fixture schedules early in the planning process to avoid installation delays.
Show compliance covers light spill restrictions into adjacent aisles, lumen and foot-candle guidelines for different zones, and heat management requirements even with efficient LED fixtures. Maintain emergency egress sightlines and use only approved fixtures with proper flame ratings. Union jurisdictions for electrical and rigging work vary by venue, requiring coordination with show services to schedule installation windows and ensure proper supervision throughout the build process.
Turnkey vs. Custom vs. Hybrid: Strategic Comparison

Turnkey island rentals deliver speed, cost predictability, and integrated lighting packages with comprehensive on-site support. This approach excels for busy event calendars, multiple shows per year, evolving messaging requirements, and tight timelines where installation risk must be minimized. The rental model provides access to premium lighting technology and professional design without the capital investment or operational burden of ownership.
Custom purchase options offer complete ownership and permanent customization capabilities but require higher upfront investment, ongoing storage costs, maintenance responsibilities, and upgrade planning. The break-even point typically occurs around 4-6 uses annually, depending on booth complexity and show frequency. Custom builds make sense for exhibitors with consistent messaging, dedicated storage facilities, and internal logistics capabilities.
Hybrid approaches combine rental infrastructure with owned branded elements, creating consistency across show series while maintaining flexibility. For example, you might rent the structural system and lighting grid while owning specific lightboxes, hanging signs, or specialty fixtures that reinforce brand identity and can be reused across multiple events.
Budgeting: What Drives Cost in Light-Forward Island Turnkey Booths
Understanding cost drivers helps you allocate budget where it delivers maximum visual impact. Island turnkey booths with lighting vary significantly in price based on footprint size, lighting complexity, and structural requirements.
Primary Cost Drivers
Footprint size creates the foundation cost—a 30x30 island requires roughly four times the lighting coverage of a 20x20, not just double. Lighting complexity follows: basic LED spotlights cost far less than DMX-controlled RGB systems with scene programming. Rigging and truss systems add substantial expense, especially for overhead grids supporting multiple fixture types.
Show labor rates fluctuate dramatically by market—Las Vegas union electrical runs 40-60% higher than regional markets. Electrical consumption compounds over multi-day shows, particularly with high-wattage legacy fixtures. Double-deck structures require engineered rigging with higher load ratings and additional safety equipment.
Smart Savings Without Losing Impact
Prioritize illuminated hero graphics and properly sized hanging signs over excess furniture. One well-lit 12-foot lightbox tower creates more brand presence than three non-illuminated elements. Use modular, collapsible lightboxes to reduce shipping weight and drayage costs by 30-40%.
Specify high-CRI LEDs with efficient drivers to cut power consumption and eliminate heat management costs. Standardized rental furniture with custom branded accents delivers professional appearance at fraction of fully custom build pricing.
Cost-Saving Insight: A 20x20 island with strategic LED backlighting and overhead wash typically costs 25-35% less than equivalent halogen systems when factoring power, cooling, and labor requirements.
How to Choose the Right Island Turnkey Booth Size and Layout
Successful island selection starts with translating show goals into spatial requirements, then optimizing lighting to support those functions.
Start with Show Goals
Lead generation targets determine demo station quantity—plan 15-20 qualified conversations per station per day. Meeting volume requirements dictate private space allocation. Content capture needs influence lighting quality specifications, particularly CRI ratings for photography and flicker-free drivers for video.
Press and analyst briefings require controlled lighting environments with adjustable scenes for presentation and discussion modes.
Translate Goals to Space
20x20 islands accommodate 2-3 demo stations, one small meeting area, and central lightbox tower. This size works for focused product launches or established brands maintaining market presence.
20x30 islands support 3-4 demo stations, hospitality counter, two meeting areas, plus hanging sign with comprehensive wash lighting. Ideal for companies balancing lead generation with relationship building.
30x30+ islands enable dedicated theater or stage areas, full tech labs, hospitality lounges, and storage rooms. These flagship presences suit major product launches or market leadership positioning.
Traffic Modeling and Accessibility
Map primary aisle approaches and align illuminated focal points with highest-traffic vectors. Position hero lightboxes and hanging signs to catch sightlines from main thoroughfares.
Maintain 6-8 feet clearance around demo stations to prevent bottlenecks. Light meeting areas with flattering 3000-3500K temperatures for comfortable face-to-face conversations. Ensure accessibility compliance with even lighting coverage and clear sight lines to emergency exits.
Planning a Lighting Strategy That Works

Effective lighting strategies layer multiple light types to create hierarchy, guide traffic flow, and support specific activities within your island space.
Step-by-Step Approach
Define focal points first: product hero displays, primary demo stations, and main signage elements. These receive highest light levels and most precise color rendering.
Choose lighting layers systematically. Ambient wash provides base illumination across the footprint. Task spots highlight specific products or demo areas. Accent backlighting creates depth and brand presence through SEG graphics and logos.
Set color temperatures by zone function—demos need 4000K CRI 90+ for accurate product representation, while lounge areas benefit from warmer 3000-3500K for comfort. Program multiple scenes: presentation mode with higher levels, peak-traffic mode with balanced coverage, and photo/video mode with flicker-free, even illumination.
Test for Glare and Spill
Position fixtures at 30-45 degree angles to minimize direct glare on screens and faces. Use diffusers or egg crate louvers where necessary. Test for light spill beyond booth boundaries during setup—many shows enforce strict guidelines about illumination affecting neighboring exhibits.
Photography and video require special consideration: ensure even illumination on faces, avoid mixed color temperatures within camera view, and specify flicker-free drivers rated for high-speed filming.
Specifying Electrical for Lighting-Heavy Islands
Proper electrical planning prevents on-site failures and ensures smooth operation throughout your show.
Essential Worksheet Items
Create detailed fixture schedules listing wattage and amperage per driver. Calculate total circuit count by zone, accounting for startup surge loads. Add AV loads separately—LED walls, monitors, and media servers often require dedicated circuits.
Include dedicated circuits for coffee equipment, culinary demonstrations, device charging bars, and storage area AV systems. Build in 20-30% headroom for unexpected additions or equipment changes.
Develop emergency plans with clearly labeled breakers and ability to isolate critical demo circuits if problems arise. This prevents total booth shutdown during troubleshooting.
Coordination and Timing
Align electrical drop locations with truss positions and floor plan requirements during initial planning. Confirm show-provided power testing timeline—many venues restrict electrical testing to specific windows before show opening.
Submit electrical requirements early with complete load calculations. Late submissions often face delays or require expensive rush processing fees.
Designing a Hanging Sign and Overhead Light Grid
Overhead elements create the strongest visual impact from distance while providing practical lighting coverage across your island footprint.
Hanging Sign Strategy
Select shapes based on primary aisle approaches—rectangular signs work well for linear sight lines, while circular or diamond shapes catch attention from multiple angles. Design your hanging sign graphics for maximum readability and coordinate downlighting to reinforce your brand presence from every approach.
Frequently Asked Questions
What are the main benefits of integrating strategic lighting into island turnkey booths?
Strategic lighting transforms island turnkey booths into engaging, 360-degree visible spaces that attract more foot traffic and improve lead quality. It enhances product demonstrations and illuminated branding, making the booth a magnetic engagement hub that stands out on the show floor.
How does an island turnkey booth with lighting differ from a standard island booth?
An island turnkey booth with lighting has illumination designed into its architecture from the start, providing consistent visibility from all sides and highlighting key brand elements. In contrast, a standard island booth often lacks integrated lighting, which can result in missed opportunities to capture attention and showcase products effectively.
What factors should exhibitors consider when choosing the size and layout of a lighting-forward island turnkey booth?
Exhibitors should evaluate their traffic goals, product demonstration needs, and brand visibility priorities when selecting booth size and layout. The lighting plan must complement the space, ensuring even illumination and avoiding shadows, while also accommodating electrical access and overhead rigging for hanging signs or light grids.
What are the key considerations for power, rigging, and safety when planning lighting for island turnkey booths?
Exhibitors need to ensure sufficient and properly distributed electrical capacity to support lighting without overload. Rigging must comply with venue regulations and safely support hanging elements like light grids or signs. Safety protocols include secure installation, cable management, and adherence to fire codes to protect staff and visitors.